ICT Class 8
Ch-2 Learn to Code-03
ICT Class 8 Learn to Code Important Notes – How to develop Mobile App – Here we will discuss ICT class 8 Chapter 2 according to new Curriculum. We already discussed Important Points To Remember and Basic Shortcut Keys , exercise used in MIT app inventor. In this ICT Class 8 Ch-2 Learn to Code-03 we will learn – Authorized email account बनाना सीखेंगे| , Different type of apps के बारे में समझेंगे| ,App inventor की मदद से mobile app बना पाएँगे !
How to develop Mobile App Notes
Before you start developing mobile apps you must know about Gmail Account and steps to create Gmail Account . Here Gmail Id is required to register /Login on MIT App Inventor.
What is App ?
App एक software program है, जिसे specific task के लिए बनाया जाता है ।
Benefits Of App –

Types Of Apps –

Introduction to MIT app inventor
MIT app inventor एक visual blocks-based programming environment है . It helps in making mobile apps.
यह Google द्वारा प्रदान किया गया है, Massachusetts Institute of Technology इसे maintain करती है| इसका नेतृत्व Professor Hal Abelson (हाल एबेलसन), Mark Friedman (मार्क फ्ऱीडमैन), MIT CSAIL के staff members और छात्रों की टीम करती है।
Benefits of MIT app inventor:

Methodology Of Making App –

Interface of MIT App Inventor –
इसमें सबसे ऊपर Menu Bar होता है और उसके नीचे वाले Bar मे right side पर Designer view और Blocks Editor होता है|
DESIGNER VIEW:
Designer view चार भागों में विभाजित है | पैलेट (palette), व्यूअर (viewer), कंपोनेंट्स (components), प्रॉपर्टीज (properties).
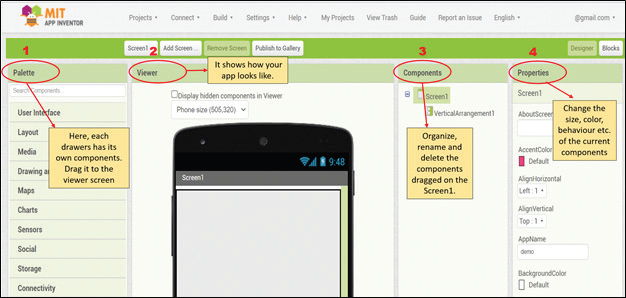
Palette– यह भाग left साइड पर होता है| इसमें 13 drawers – (user interface, layout, media, drawings, maps, etc.) हैं | हर drawer में कुछ components होते हैं जैसे- User interface (buttons, labels, images, etc.), layout (horizontal/vertical alignments) etc.
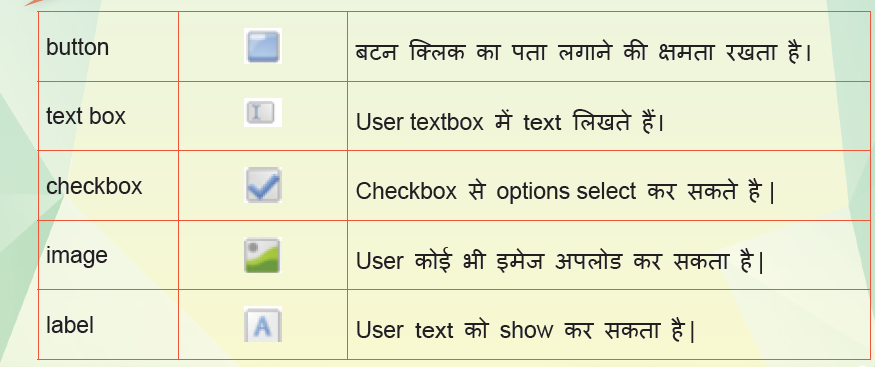
Functions of Some Components is as below –
Viewer – इस भाग में फ़ोन स्क्रीन होती है| जिस पर हम app का design बनाते हैं और यह सुनिश्चित कर सकते हैं, कि App कैसा दिखेगा ?
Components – इस भाग में वे सारे components दिखते हैं, जो Viewer भाग में फ़ोन स्क्रीन पर उपस्थित होते हैं | आप उन्हें rename, delete और rearrange कर सकते हैं ।
Properties – यह भाग right साइड पर होता है| इससे हम components की properties जैसे उनका color, size, height, width, background etc. बदल सकते हैं|
LAYOUT – Screen Arrangement Components
Horizontal Arrangement –
इसमें components को horizontal form (दाएं से बाएं) में रखा जाता है |
Vertical Arrangement –
इसमें components को vertical form (ऊपर से नीचे की ओर) में रखा जाता है |
Table Arrangement –
इसमें components को tabular form में प्रदर्शित किया जाता है।
BLOCK EDITOR :
Blocks Editor App इन्वेंटर स्क्रीन के right side पर होता है। इस जगह पर मोबाइल App की प्रोग्रामिगं की जाती है|
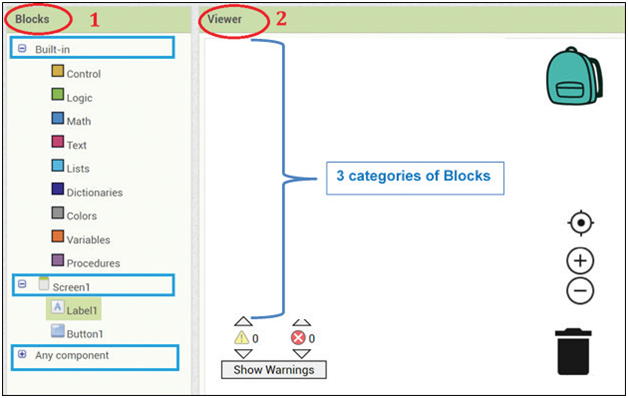
Block editor screen के दो भाग होते हैं – Blocks और Viewer
1. Blocks भाग में तीन categories होती हैं –
Category 1-: Built-in blocks
Category 2: Screen-1
Category 3: Any component
Category 1: Built-in Block – इसमें हर category के basic code blocks होते हैं। जैसे ही आप इन पर क्लिक करेंगे, वैसे ही blocks दिखेंगे।
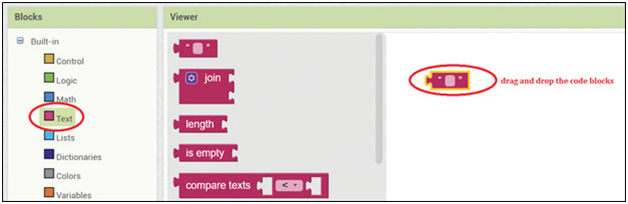
जैसे यहाँ TEXT – Built-in box पर क्लिक है, तो उसके ही code blocks show हुए हैं। As per your need आप किसी भी code block को drag करके viewer screen पर drop कर दें । बस इसी तरह code puzzles को जोड़ते जाएँ ।
Category- 2: Screen-1
Category- 3: Any Component
इन दोनों categories में आपको वे सब components दिखेंगे, जो अपने App के डिज़ाइन में इस्तेमाल किए गए हैं। प्रत्येक component के पास अपने स्वयं के event handlers, methods और properties का सेट होता है।
2.Viewer भाग में आप code/program blocks को assemble करते हैं।
Block Editor window, Designer view के साथ interlinked हैं, Designer में किए गए कोई भी बदलाव तुरंत Block Editor के components में दिखाई देते हैं ।
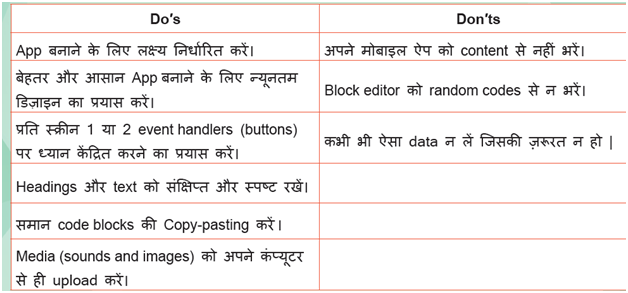
Do′s and Don′ts While Making App