UNIT-3 MULTIMEDIA DESIGN – GIMP Important(Exercise Questions)
UNIT-3 MULTIMEDIA DESIGN – GIMP Important(Exercise Questions)
Exercise
Q1.What does GIMP stand for?
Answer: GIMP stand for GNU Image Manipulation Program.
Q2. What is Gimp’s default graphics file format?
Answer: XCF, short for eXperimental Computing Facility, is Gimp’s default graphics file format..
Q3.List five main components of GIMP environment.
Answer: 1 The Toolbox
2 The Image Window
3 The Layers, Channels, and Paths Dialogs
4 The Dialogs for Color, Brushes, Patterns, Gradients, and Palettes
Q4. What are Dockable Dialogues in GIMP?
Answer:
A “dock” is a container window that can hold a collection of persistent dialogs, such as the Tool Options dialog, Brushes dialog, Palette dialog, etc.
GIMP has two default docks:
- The Layers, Channels and Paths dock.
- The Brushes, Patterns and Gradients dock.
Q5.Create a file in GIMP and demonstrate the purpose of paint tools and selection tools.
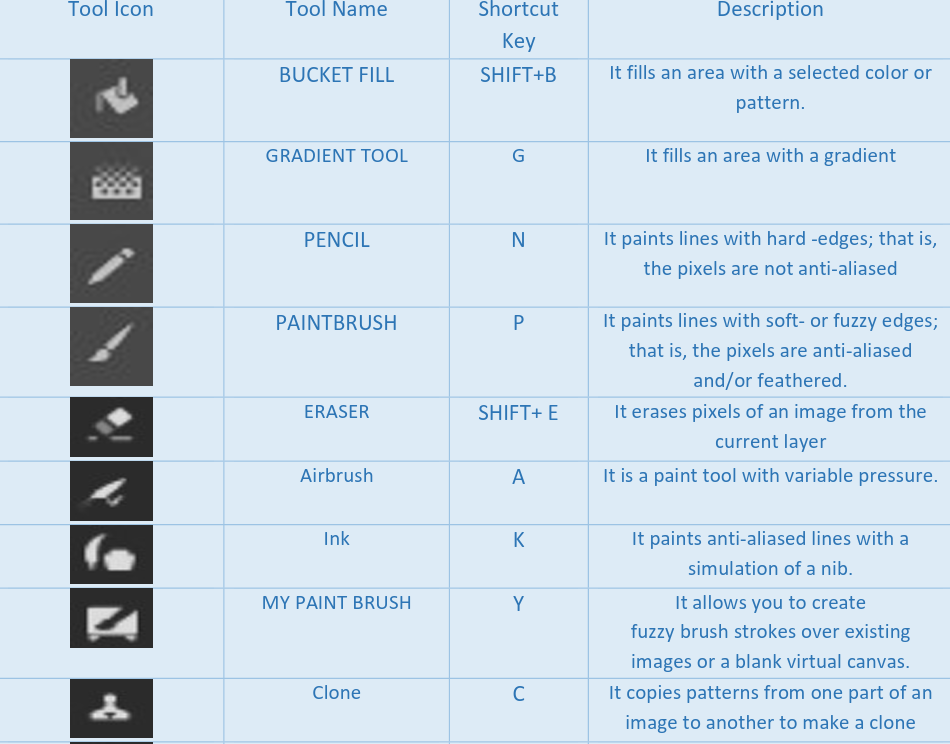
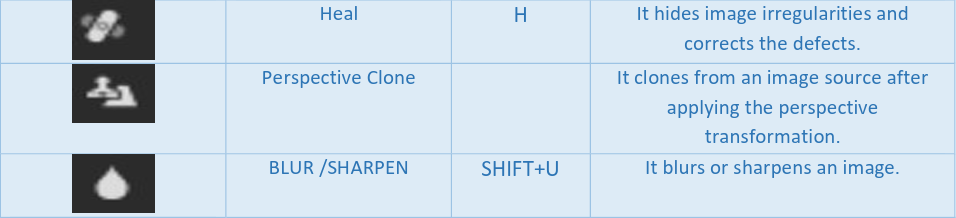
Answer: Paint tool: A paint tool is a comprehensive suite consisting of 13 basic paint features
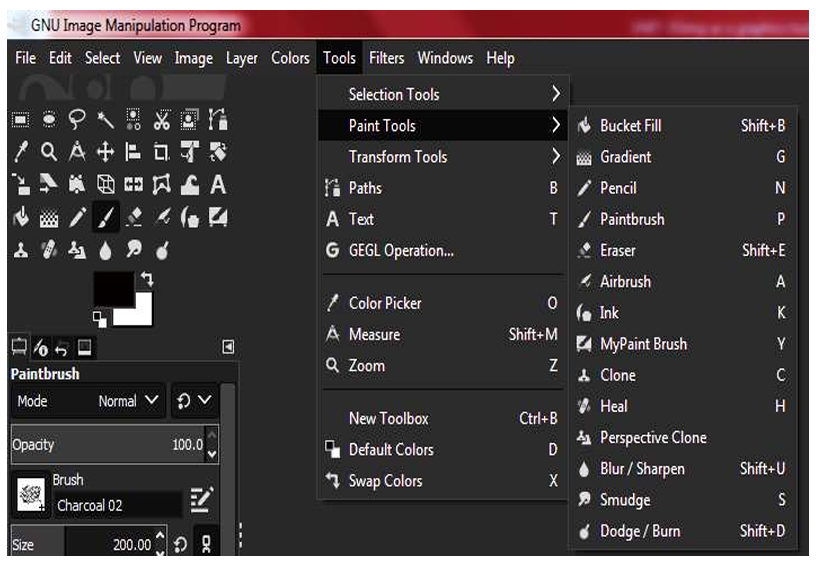
The paint tools could also be selected by clicking an icon in the toolbox or by selecting a tool from the Paint Tool tab. Shortcut keys may also be used.

Selection tools: Selection tools are designed to select regions from the active layer so you can work on them without affecting the unselected areas.
There are seven selection tools:
- the Rectangle Select;
- the Ellipse Select;
- the Free Select (the Lasso);
- the Select Contiguous Regions (the Magic Wand) ;
- the Select by Color;
- the Select Shapes from Image (Intelligent Scissors) and
- the Foreground Select.
Q6. Open an image of human eyes with red eyes effect in GIMP and perform red-eye correction.
Red eye correction: This filter is found in the image window menu under Filters → Enhance → Red Eye Removal….
The aim of this filter is to remove red eyes from an image. Before applying the “Red Eye Removal” you must do a selection (lasso or elliptical) of the boundary of the iris of the eye(s) having a red pupil. After only you can apply the filter on this selection. If you don’t make this selection, the filter inform you that : “Manually selecting the eyes may improve the results”.
Q7.Apply Comic Book effect to an image in GIMP.
Answer: This filter is found in the image window menu under Filters → Alpha to Logo → Comic Book…
It adds a comic book effect to the image.
Q8. List the steps for cloning in GIMP.
Answer: Clone Tool: Clone tool is used for copying the pixels from selected portions of an image to a destination area, the user wants to cover, or for reproducing the selected portions of an image.
Cloning is done via following steps:
a) “Clone” tool from the toolbox menu is selected. Its icon is shaped like a traditional stamp.
b) One of the brush types is selected from brush Menus in GIMP.
c) Ctrl key is pressed while using mouse to click and select the area of the source image for pixel extraction.
d) The selected pixels are applied by left click of a mouse in the destination areas.
e) The process is repeated if necessary. For example select a star brush; Press the ctrl key is over a red tile region of the HUT appearing in the image. The selected tile colour pixels are stamped on the walls of HUT by left clicking of the mouse.
Q9 Implement the following features of GIMP on an image:
i) Resize-Crop:
If an image is too big, such that it does not fit to file window, then window may be resized by dragging the mouse. After resizing the window, “Zoom to Fit Window” may be chosen from the “View” menu, and the image will be resized to fit the window. Image could also be resized using “Scale Image” in Image menu.
The image may be cropped using “crop” tool in Toolbar (Transform tools) or by going to the “Image” menu and choosing “Crop to content.”
ii) Brightness/Contrast:
The Brightness-Contrast tool adjusts the brightness and contrast levels for the active layer or selection. This tool is easy to use, but relatively unsophisticated.
iii) Colorize with Hue and Saturation:
The Hue-Saturation tool is used to adjust hue, saturation and lightness levels on a range of color weights for the selected area or active layer.
You can get to the Hue-Saturation tool in two ways :
- In the the image-menu through: Tools → Color Tools → Hue-Saturation, or Colors → Hue-Saturation
- By clicking the tool icon: in Toolbox, provided that you have installed color tools in Toolbox.
iv) Zoom:
The Zoom Tool is used to change the zoom level of your working image. If you only click on the image, the zoom is applied to the whole image. But you can also click-and-drag the mouse pointer to create a zoom rectangle.
- You can get to the Zoom Tool from the image-menu through : Tools → Zoom,
- or by clicking the tool icon in Toolbox.
v) Add a border to an image:
It adds a border to the image. You can specify the thickness of the border as well as the color. The four sides of the border are colored in different shades, so the image area will appear raised.
The image will be enlarged by the border size.
This filter is found in the image window menu under Filters → Decor → Add Border…
vi) Add text to an image:
We can add 3D text, rotating text, colorful text, etc. in our images using GIMP.
To add text on an image, follow the below steps:
- Create or Open an Image
- Select the Text Tool
- Initiate the Text Input
- Enter the Text
- Close the Editor
The toolbox contains the following options:
- Font
- Size
- Use Editor
- Antialiasing
- Hinting
- Color
- Justify
- Indentation, line and letter spacing
- Box
vii) Rotate an image by 90 degrees’ :
The rotate tool in GIMP is used to rotate the objects; these objects can be a selection, image, layer, or any other image component. We can activate this tool by navigating through Tools-> Transform Tools-> Rotate menu or by just hitting the “SHIFT+R” keys.
Follow the below steps to rotate an image:
Step1: Create or Open an Image
Step2: Select the Rotate Tool
Step3: Specify the Rotation Angle
Step4: Rotate the Image
Q10. Demonstrate working of Layers in GIMP.
Answer: Layers in GIMP allow a user to work on images placed onto a stack and are accessed in layer by layer manner. Each layer could be imagined as clear glass sheet to place an image. If an image is modified on the current layer, it would not affect the layers above and below the current layer. Layers at the top of the layer stack will appear in the foreground of the image whereas layers at the bottom make up the background.
Layer Dialogue has many options available to perform various functionalities. They are listed as follows :
A. Adding a new layer: It allows the user to add a layer by naming the layer, setting up width and height, and choosing whether it should be transparent, white, or black in the background.
B. Create New Layer Group: It creates a new layer group and adds it to an image.
C. Move the layer up: It simply moves the layer up in the stack of layers for processing.
D. Move layer down: It moves the layer down and the layer would be placed underneath the background layer.
E. Duplicate the layer: It creates an identical layer by duplicating.
F. Anchor the layer: It merges the image on current layer to another image on the layer below Gimp creates a “floating layer” and this layer contains what a user wants to copy to other layers. Pressing the anchor option will make floating layer disappear, the contents of the floating layer are transferred to the destination layer.
G. Delete the layer: It removes the currently selected layer.
Q12. What are the layer masks & channels in GIMP?
Answer:
The Add Layer Mask command adds a layer mask to the active layer. It displays a dialog in which you can set the initial properties of the mask.
A layer mask lets you define which parts of the layer are opaque, semi-transparent or transparent. When a layer mask is applied to an image over the layer, the mask makes parts of the layer transparent so that any layers below are shown through.
Steps for layer masking are as follows:
i) Right Click on the layer needed to be masked and Click on Add Layer Mask.
ii) A mask layer option is chosen and thumbnail will appear in right layers window with the image.
iii) Now all the operations performed on the canvas will be on the mask.
iv) Operations like selection; paint etc. could be applied to the mask.
v) After operations, setting the transparency levels will generate an effect in which layer below the mask is visible depending on transparency from black to light gray gradients.
Channels in GIMP are very similar to layers. Channels dialogues can be selected in any combination.
The purpose of ‘Channels’ is to process color channels (applied to images) and maintain selection.
Q13. What is the purpose of alpha channels in GIMP?
Answer:
Alpha channels under Layers Menu are used to signify transparency within an image and are created automatically while creating a new layer in GIMP. The painted black areas within the alpha channel indicate that transparency should appear at that part of the image. The creative use of alpha channels allows partial transparency or fading effects due to the inclusion of a gradient design in the alpha channel.
The steps to Add Alpha Channel to a sample image are given below:
1) Default Background layer will appear in the layers dock with a default color white. Change its color to Yellow.
2) Add another layer from layer menu new layer
3) Let us name this layer as House and paste the image of some house
4) Using the selection tool and select a portion the house. and select a portion the house.
5) Go to Layer menu Transparency Color to Alpha
6) Select white (here white means transparency)
7) The selected portion will get a yellow color similar to the background.
8) Transparency tool has various other options like removing alpha channel which will remove this yellow color and the house will revert to its normal color.
Q14. How can we create an outline around text in GIMP?
Answer: Adding the text outline is a useful task for the image. It makes the image more visible and attractive.
How to Add Text Outline in GIMP:
Step1: Create an Image
Step2: Select The Text Tool
Step3: Add Text
Stpe4: Create a path from Text
Step5: Add a Transparent Layer
Step6: Select From Path
Step7: Grow the Text
Step8: Select The Bucket Fill Tool
Q15. How do we merge an image from a file to the current image in GIMP?
Answer: Select Merge Visible Layers from the context menu by right-clicking the top layer in your Layers Toolbar and pressing “Merge” when a pop-up opens.
Q16.List steps to perform masking of images in GIMP.
Answer: Layer Masks in GIMP offer an elegant way to edit specific portions of images placed in layers within a GIMP document.
Steps for layer masking are as follows:
i) Right Click on the layer needed to be masked and Click on Add Layer Mask.
ii) A mask layer option is chosen and thumbnail will appear in right layers window with the image.
iii) Now all the operations performed on the canvas will be on the mask.
iv) Operations like selection; paint etc. could be applied to the mask.
v) After operations, setting the transparency levels will generate an effect in which layer below the mask is visible depending on transparency from black to light gray gradients.
Q17.What is the purpose of stamp tool in GIMP?
Answer: The stamp icon in the GIMP toolbox represents the Clone tool, which draws pixels sampled from a source image using any of GIMP’s brushes. In addition to using it as a basic stamping tool, you can achieve a number of interesting effects by selecting options from the toolbox menu. The Clone tool’s alignment options control how your brush strokes sample pixels from the source image, enabling you to make precise corrections to a photo or paint image filters such as blur or lens distortion. By saving a custom brush in the GIMP Brushes folder, you can stamp basic patterns using the Clone tool.
Q18.List the possible steps to create a polygon in GIMP.
Answer:
A step by step procedure to create a polygon using the path tool is as follows
i) Set Design and Polygonal options in the toolbox.
ii) Draw the path lines for polygon shape with the rider.
iii) Use any of the two options available to create a path: Selection from path or Stroke path.
iv) Save the file.
Q19.What is the purpose of Scale image in GIMP?
Answer: The Scale Image command enlarges or reduces the physical size of the image by changing the number of pixels it contains. It changes the size of the contents of the image and resizes the canvas accordingly.
Q20.How can you change the brightness of an image in GIMP?
Answer: This slider sets a negative (to darken) or positive (to brighten) value for the brightness, decreasing or increasing bright tones.
Q21.List the filters that may aid in blurring an image in GIMP.
Answer:
The Blur sub-menu contains the following blur effects:
- Focus Blur
- Gaussian Blur
- Lens Blur
- Mean curvature Blur
- Median Blur
- Pixelize
- Selective Gaussian Blur
- Variable Blur
- Circular Motion Blur
- Linear Motion Blur
- Zoom Motion Blur
- Tileable Blur