Class 10 UNIT 1 SESSION 4. CREATE AND CUSTOMIZE TABLE OF CONTENTS:
In this article you will get the notes of class 10 subject Information Technology CBSE Code 402.It contain notes of session 4 Create and Customize Table Of Content. Here you will get the best notes of class 10 subject IT Code 402.You can get good score in class 10 IT CBSE Exam by using these Notes.
Creating a Table of Contents:
Writer’s table of contents feature lets you build an automated table of contents from the headings in your document.
Opening Writer’s Table Of Contents Feature:
- When you create your document, use the following paragraph styles for different heading levels (such as chapter and section headings): Heading 1, Heading 2, and Heading 3. These are what will appear in your table of contents.
- Place the cursor where you want the table of contents to be inserted.
- Select Insert > Indexes and Tables > Indexes and Tables.
- Change nothing in the Insert Index/Table dialog. Click OK.
Updating the table of contents:
- Place the cursor within the table of contents.
- Right-click and select Update Index/Table from the pop-up menu.
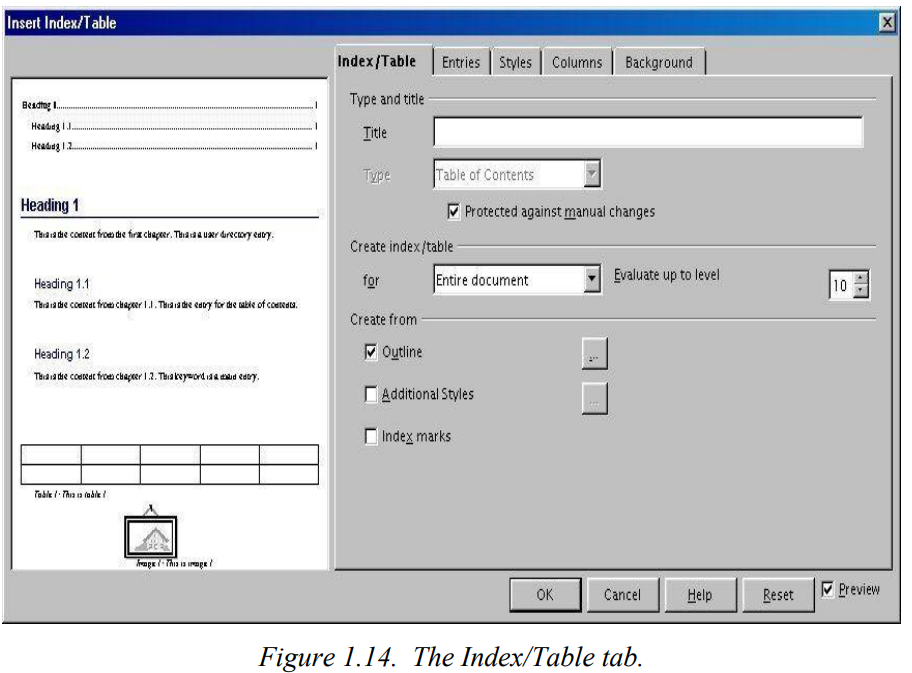
Setting Basic Attributes:
To set the table’s basic attributes:
- From the Type drop-down list in the Type and title area of the tab, select Table of Contents if it isn’t already selected.
- From the drop-down list in the Create index/table area, select Entire document.
- In the Create from area, check the Outline check box.
- In the Create from area, clear the Index marks check box.
Adding A Title:
If you’d like the table of contents to have a title, enter it in the Title field. To delete the title, clear the Title field.
Protecting Against Manual Changes:
To protect the table of contents from being changed accidentally, check the Protected against manual changes check box.
If this box is checked, the table of contents can only be changed using the context menu or the Insert Table/Index window.
If the box isn’t checked, the table of contents can be changed directly on the document page, just like other text.
Changing The Number Of Levels:
To change the number of levels evaluated, enter the desired number in the Evaluate up to level spin box.
Assigning Custom Styles:
To assign paragraphs formatted with custom styles, follow these steps:
- In the Create from area, check the Additional Styles check box.
- Click the (…) button to the right of the check box. The Assign Styles window opens.
- In the Not applied column, click the style that you want to assign to the table of contents.
- Use the >> button to move the selected style to the desired outline level.
- Click OK to save your changes and return to the Index/Table tab. Or, click Cancel to return without saving your changes.
Using The Entries Tab:
To begin, click a level number in the Level column to select the outline level whose elements you want to format. The Structure line displays the elements for entries in that level. Each button on the Structure line represents one element:
The E# button represents the chapter number.
The E button represents the entry text.
The T button represents a tab stop.
The # button represents the page number.
The LS button represents the start of a hyperlink.
The LE button represents the end of a hyperlink.
Each white field on the Structure line represents a blank space.
Deleting Elements:
To delete an element from the Structure line, click the button that represents that element and then press the Delete key on your keyboard.
Adding Elements:
To add an element to the Structure line, follow these steps:
- Place your cursor in the white field to the left of where you want to insert the element.
- Click one of the five buttons that are just below the Structure line. A button representing the new element appears on the Structure line.
Adding Hyperlinks:
- On the Structure line, place your cursor in the white field to the left of the E# button.
- Click the Hyperlink button. An LS button, representing the start of the hyperlink, appears on the Structure line.
- On the Structure line, place your cursor in the white field to the right of the E button.
- Click the Hyperlink button again. An LE button, representing the end of the hyperlink, appears on the Structure line.
Applying Character Styles:
To apply a character style to an element on the Structure line:
- On the Structure line, click the button that represents the element to which you want to apply a style.
- From the Character Style drop-down list, select the desired style. Writer applies the selected style to the selected element.
To view or edit the attributes of a character style, select the style from the Character Style drop-down list and then click the Edit button.
Applying Changes To All Outline Levels:
To apply the displayed structure and formatting to all outline levels, click the All button.
Using The Styles Tab:
To apply a paragraph style to an outline level, follow these steps:
1. In the Levels list box, select the desired outline level by clicking it.
2. In the Paragraph Styles list box, click the paragraph style that you want to apply.
3. Click the < button to apply the selected paragraph style to the selected outline level.
To remove paragraph styling from an outline level:
1) In the Levels list box, select the desired outline level by clicking it.
2) Click the Default button. To view or edit the attributes of a paragraph style, click the style in the Paragraph Styles list box and then click the Edit button.
Using The Background Tab:
Use the Background tab, pictured in Illustration 5 on page 7, to add color or a graphic to the table background.
Adding A Graphic:
- From the As drop-down list, select Graphic. The Background tab displays the graphics options.
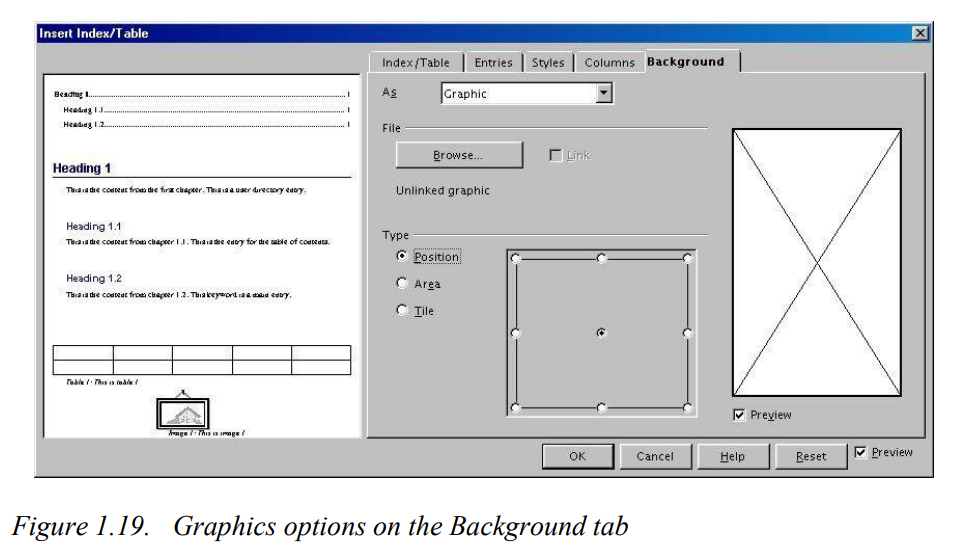
- Click the Browse button. The Find Graphics window opens.
- Find the graphic file that you want to use and then click the Open button. The Find Graphics window closes and the selected graphic appears in the graphic preview box on the right-hand side of the Background tab.
- In the Type area of the Background tab, choose how you want the background graphic to appear:
● To position the graphic in a specific location in the background, select Position and then click the desired location in the position grid.
● To stretch the graphic so that it fills the entire background area, select Area.
● To repeat the graphic across the entire background area, select Tile.
Deleting Color Or Graphics:
- From the As drop-down list, select Color.
- Click No Fill on the color grid.
Saving The Table Of Contents
To save the table of contents so that the table appears in your document, click OK. The Insert Index/Table window closes and the table of contents appears in your document.
Maintaining A Table Of Contents Editing A Table Of Contents
To edit an existing table of contents:
- Click anywhere in the table of contents and then right click. The context menu appears.
- From the context menu, choose Edit Index/Table. The Insert Index/Table window opens and you can edit and save the table using the four tabs described in the previous chapter.
Updating A Table Of Contents
To update a document’s table of contents when changes are made to the document:
- Click anywhere in the table of contents and then right click. The context menu appears.
- From the context menu, choose Update Index/Table. Writer updates the table of contents to reflect the changes in the document.
Deleting A Table Of Contents
To delete the table of contents from a document:
- Click anywhere in the table of contents and then right click. The context menu
appears. - From the context menu, choose Delete Index/Table. Writer deletes the table of content.
I’ve bookmarked your site, and I’m adding your RSS feeds to my Google account.
Simply wish to say your article is as astonishing. The clarity in your post is simply great, and I could assume you are an expert on this subject. Well with your permission let me grab your RSS feed to keep updated with forthcoming post. Thanks a million and please keep up the gratifying work.