Images can be added to a document in several ways: by inserting an image file, directly from a graphics program or a scanner, or from the Open Office Gallery.
Que.1 How to insert an image in a text document?
Ans: Inserting An Image File:
When the image is in a file stored on the computer, you can insert it into an Open Office document using either of the following methods:
Drag and Drop:
- Open a file browser window and locate the image you want to insert.
- Drag the image into the Writer document and drop it where you want it to appear.
Insert Picture Dialog:
- Click in the Open Office document where you want the image to appear.
- Choose Insert > Picture > From File from the menu bar.
- On the Insert Picture dialog navigate to the file to be inserted,
select it, and click Open.
Inserting An Image From The Clipboard:
Using the clipboard, you can copy images into an Open Office document from another Open Office document and from other programs. To do this:
- Open both the source document and the target document.
- In the source document, select the image to be copied.
- Move the mouse pointer over the selected image and press Ctrl+ C to copy theimage to the clipboard.
- Switch to the target document.
- Click to place the cursor where the graphic is to be inserted.
- Press Ctrl + V to insert the image.
Inserting An Image Using A Scanner:
In it, click where you want the graphic to be inserted and select Insert > Picture > Scan > Select Source.
Inserting An Image From The Gallery:
- To open the Gallery, click on the Gallery icon or choose Tools > Gallery from the menu bar.
- Navigate through the Gallery to find the desired picture.
- To insert the picture, click and drag it from the Gallery into the Writer document. You can also right-click on the picture and choose Insert>Copy.
Que.2 How to modify an image in a text document?
Ans: Modifying An Image:
When you insert a new image, you may need to modify it to suit the document.
Using The Picture Toolbar:
When you insert an image or select one already present in the document, the Picture toolbar appears. You can set it to always be present (View > Toolbars > Picture).
Two other toolbars can be opened from this one: the Graphic Filter toolbar, which can be torn off and placed elsewhere on the window, and the Color toolbar, which opens as a separate floating toolbar. From these three toolbars, you can apply small corrections to the graphic or obtain special effects.
Graphics mode
You can change color images to grayscale by selecting the image and then selecting Grayscale from the Graphics mode list.
Flip vertically or horizontally
To flip an image vertically or horizontally, select the image, and then click the relevant icon .
Filters: you can undo all the changes by pressing Ctrl+ Z or Alt+ Backspace or by selecting Edit > Undo.
Color: Use this toolbar to modify the individual RGB color components of the image (red, green, blue) as well as the brightness, contrast, and gamma of the image. If the result is not satisfactory, you can press Ctrl+ Z to restore the default values.
Transparency:
Modify the percentage value in the Transparency box on the Picture toolbar to make the image more transparent.
Using The Formatting Toolbar And Picture Dialog:
When an image is selected, you can customize some aspects of its appearance using the tools available on the Formatting toolbar as well as in the dialog that is shown by right-clicking on the image and selecting Picture. You can, for example, create a border around the image, selecting style and color.
Que 3. How to crop an image in a text document?
Ans: Cropping Images:
To start cropping the image, right click on it and select Picture from the pop-up menu. In the Picture dialog box, select the Crop Page.
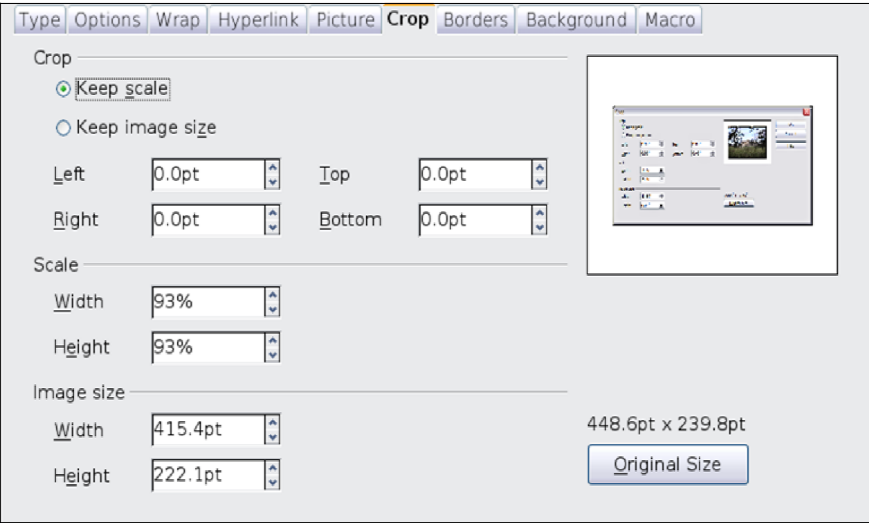
Keep scale / Keep image size:
When Keep scale is selected (default), cropping the image does not change the scale of the picture.
When Keep image size is selected, cropping produces enlargement, shrinking, or distortion of the image
so that the image size remains constant.
Left, Right, Top, and Bottom:
The image is cropped by the amount entered in these boxes. For example, a value of 3cm in the Left box cuts 3 cm from the left side of the picture.
• When Keep scale is selected, the size of the image also changes, so in this example the width will be reduced by 3cm.
• When Keep image size is selected, the remaining part of the image is enlarged or shrunk so that the width and height of the image remains unchanged.
Width and Height:
The Width and Height fields under either Scale or Image size change as you enter values in the Left, Right, Top, and Bottom fields. Use the thumbnail next to these fields to determine the correct amount by which to crop.
Que 4. How to resize an image in a text document?
Ans. Resizing an Image:
The inserted image might not fit perfectly into the document if it is too big or too small. In these cases, you can use Writer to resize the image.
- Click the picture, if necessary, to show the green resizing handles.
- Position the pointer over one of the green resizing handles. The pointer changes shape giving a graphical representation of the direction of the resizing.
- Click and drag to resize the picture.
- Release the mouse button when satisfied with the new size. The corner handles resize both the width and the height of the graphic object simultaneously, while the other four handles only resize one dimension at a time.
Que.5 How to rotate a picture in a text document?
Ans. Rotating a Picture:
- Open a new Draw or Impress document (File > New > Drawing or File > New > Presentation).
- Insert the image you want to rotate.
- Select the image, then in the Drawing toolbar select the Rotate icon from the Effects tear off toolbar .
- Rotate the image as desired. Use the red handles at the corners of the picture and move the mouse in the direction you wish to rotate.
To restrict the rotation angle to multiples of 15 degrees keep the Shift key pressed while rotating the image.
- Select the rotated picture by pressing Ctrl+ A, then copy the image to the clipboard with Ctrl+ C.
- Finish by going back to the location of the Writer document where the image is to be inserted and pressing Ctrl+ V.
Que.6. How to create drawing objects in a text document?
Ans: Creating Drawing Objects:
To begin using the drawing tools, display the Drawing toolbar, by clicking View > Toolbars > Drawing.
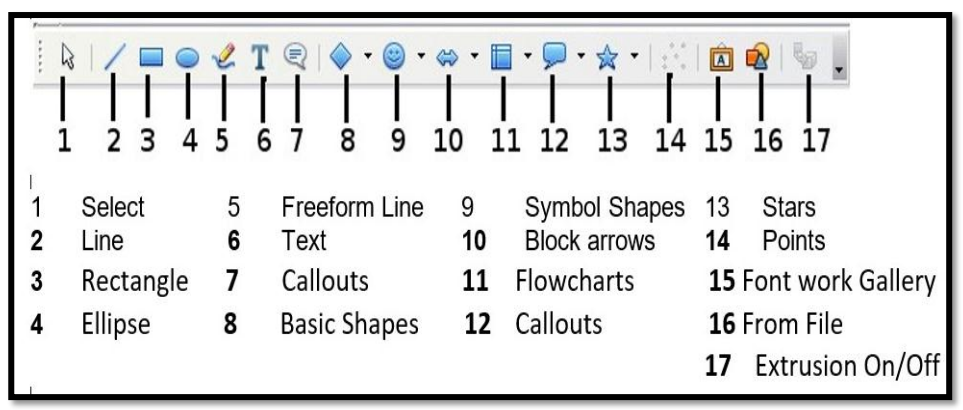
To use a drawing tool:
- Click in the document where you want the drawing to be anchored.
- Select the tool from the Drawing toolbar. The mouse pointer changes to a drawing-functions pointer .
- Move the cross-hair pointer to the place in the document where you want the graphic to appear and then click-and-drag to create the drawing object. Release the mouse button. The selected drawing function remains active, so you can draw another object of the same type
- To cancel the selected drawing function, press the Esc key or click on the Select icon (the arrow) on the Drawing toolbar.
- You can now change the properties (fill color, line type and weight, anchoring, and others) of the drawing object using either the Drawing Object Properties toolbar or the choices and dialog boxes reached by right-clicking on the drawing object.
Que.7. What do you understand by the terms:
a. Text Wrapping
b. Anchoring
Ans: (a) Text wrapping is making the text reflow along the boundaries of the frame or the object. Text wrapping options can be set using the Text Wrap panel from the Window menu.
(b) Anchoring refers to the reference point for graphics. This point could be the page, or frame where the object is, a paragraph, or even a character.
One thought on “CLASS 10 IT SESSION 2: INSERT AND USE IMAGES”