CLASS 10 UNIT 1 SESSION 5. IMPLEMENT MAIL MERGE:
In this, you will get the notes of class 10 subject information technology CBSE Code 402.In it , you will learn about how to implement mail merge. This is the important topic of Unit 1 Digital Documentation. You will get the best notes of Mail Merge of Information Technology here. You will get good score in CBSE exam code 402 by following these notes.Here are some topics in Mail Merge:
Que . What is Mail Merge?
Ans: A mail merge is a way to take a letter you’ve written and send it to a whole bunch of people, personalizing it with information about them so they might think that you typed that letter personally for them. It’s essential for any person or organization that has a lot of clients, partners, parents and children, or other people to communicate with.
Create a Mail Merge Document: Letter
- Open a template, if you have one you want to use, or create a new Writer document.
- Save the document with the appropriate name, like mailmerge_openenrollment.ods or mailmerge_parents.odt.
Note: Don’t save it in Word format. You must save it in OpenOffice.org Writer format or the mail merge won’t work. - Write out the text that will be going to everyone, and plan where you want the fields.
- Once you have the letter written out and you know what fields you need, you can delete the specific data and insert the fields from the database instead.
To Make The Data Source And Entering Data:
You’ll create a small file, one for each spreadsheet or other data source. Once you create it, you don’t have to do it again.
- Choose File > New > Database. You’ll see this window:
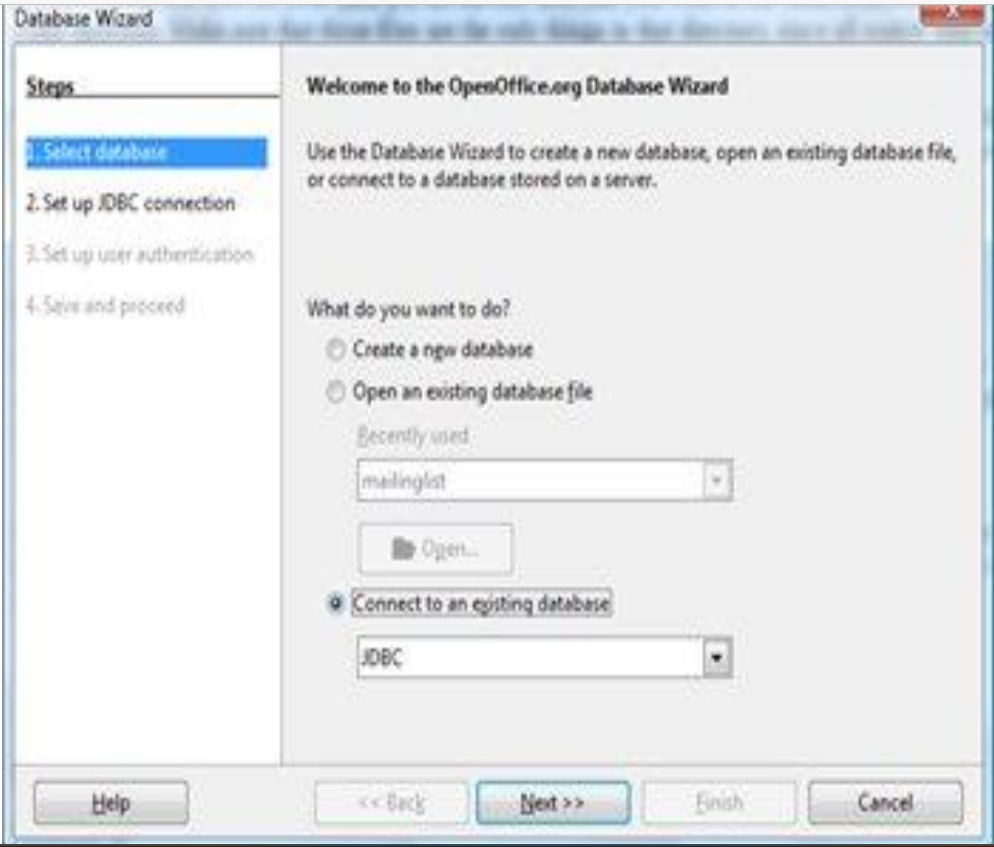
2.Select the type of data: spreadsheet data, text file data, your particular type of address book, or the type of database you’re using like Access or MySQL.
- Click Next.
- What you do here depends on what you chose as the type of data you’re working with.
- In this window, just be sure to keep the option for registering selected. Unmark the selection to open the database for editing unless you want to see the database editing window. Click Finish.
- You’ll be prompted to save the database file. The file will end in .odb and be stored in whatever directory you choose.
- You can see your databases by pressing F4 when you’re in a Writer or Calc document. Click the + icon next to the database you created to see the items named Queries and Tables. Click the + next to Tables to see the tables you created; select a table to see the data in it.
Merging The Data Source With Main Document:
- Open the letter you want to use.
- Once you have the letter written out and you know what fields you need, you can delete the specific data and insert the fields from the database instead.
Press F4. Click the + next to the database you want, then click the + next to Tables and the + next to the table you want. - Now just drag the field you want into the letter, to the place you want it.
a. Click and hold down on the name of the first field you want. Don’t click on the data, like Smithson; click on the name of the field, like last name
b. Drag the field name into the letter to the place where you want it. The mouse will have a + attached to it as shown
c. Release the mouse. The field will appear. You won’t see the data yet; you’ll see the field name.
If you didn’t get it exactly where you want it, just select it, and cut and paste it to the place where you want it. The easiest way to select a field is to click on the right side of it, hold down the Shift key, and press the left keyboard key once. Then it’s selected and you can cut or copy.
Editing a saved file of mailing labels:
To edit a saved file of mailing labels, open the saved label file in the normal way. You will be prompted to update all links. You can edit individual records in the normal way, by highlighting and changing the font name. you cannot edit all labels globally by the technique of selecting the entire document.
● Right-click any correctly spelled word in a label record.
- Select Edit Paragraph Style from the context menu.
- Then from the Paragraph Style dialog, you can make changes to the font name, the font size, the indents, and other attributes.
Printing Mailing Labels:
Preparing For Printing:
To prepare mailing labels for printing:
● Choose File > New > Labels.
● On the Options tab, ensure that the Synchronize contents option is selected.
● On the Labels tab (), select the Database and Table. Select the Brand of labels to be used, and then select the Type of label.
● If you are unable to identify your label product in the list, then you can define the labels you have. Select the User setting in the Type selection box. Click on the Format tab of the Labels dialog. The default settings are shown in .

● You can now save your label template if you are likely to use it again. Click Save.
● In the Save Label Format dialog that opens (), enter names for your label Brand and Type. Click OK.
● Click the Labels tab. Click the drop-down arrow under Database field. Select the first field to be used in the label (in this example, Title). Click the left arrow button to move this field to the Label text area
● Continue adding fields and inserting desired punctuation, spaces, and line breaks until the label is composed. shows the completed label.
● Click New Document.
Removing Blank Lines From Labels:
● First ensure that the label frames are showing the field contents rather than their underlying field names. If this is not the case, then either press Ctrl+F9 or choose View > Field Names to toggle the view.
● Next, ensure that you can see non-printing characters, such as paragraph marks, line breaks and so on. If these are not already visible, choose View > Nonprinting Characters from the Menu bar, or press Ctrl+F10, or click on the Nonprinting Characters icon ( ) on the Standard toolbar.
● Click in the first label, at the end of the last data source address field in the first line of the label. Press Delete to remove the new line character and then press Return (or the Enter key) to insert a paragraph marker.
● Click again at the end of the first paragraph to be conditionally suppressed and then choose Insert > Fields > Other. Select the Functions tab and then click on Hidden Paragraph in the Type column. Now click in the Condition box and enter the details of the condition that defines a blank address field.
Click Insert, but do not close the dialog until all lines have been amended.
● Repeat for each paragraph to be conditionally suppressed, remembering to advance the cursor to the end of the line in question before changing the last element of the condition and Inserting the result.
● Remembering that we selected Synchronize contents earlier, you should now be able to see a small window containing a Synchronize Labels button. Click on this button and the hidden paragraph fields are propagated to all the labels in your document.
Printing:
● Choose File > Print. The message shown in appears. Click Yes to print.
● In the Mail Merge dialog (), you can choose to print all records or selected records. To select records to be printed, use Ctrl+ click to select individual records. To select a block of records, select the first record in the block, scroll to the last record in the block, and Shift+ click on the last record.
● Click OK to send the labels directly to the printer.
I simply wanted to write down a quick word to say thanks to you for those wonderful tips and hints you are showing on this site.
My spouse and I love your blog and find almost all of your post’s to be just what I’m looking for. can you offer guest writers to write content for you? I wouldn’t mind producing a post or elaborating on some the subjects you write concerning here. Again, awesome weblog!
Appreciate the recommendation. Let me try it out.